19.9.05

hash reviewed

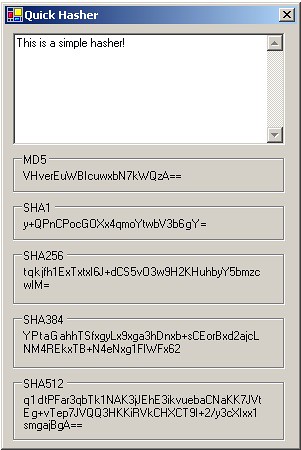
I was just reading this article http://www.eweek.com/article2/0,1759,1859751,00.asp explaining that MD5 is now bad because of collisions and stuff, so ive had another look at my hasher and added a few extras.


16.9.05

GWB = Failure

I just found out about this:

Put ‘Failure’ into Google and type ‘I’m feeling Lucky’

This is what I get (it might have changed):

http://www.whitehouse.gov/president/gwbbio.html


amaztype

I found this just then, it combines the amazon web service and flash.

http://amaztype.tha.jp/US/Books/Title?q=batman

it generates the word at the of the url using images from that topic!

15.9.05

vtkFlRenderWindowInteractor

http://cpbotha.net/vtkFlRenderWindowInteractor.html

This has just saved me a ton of time… or has it just highlighted the fact that it works and I shouldn’t have wasted about 5hrs trying to get vtkFLTK to work and used it in the first place??!?!?!?!

14.9.05

Linux woes :(

I'm a Linux noob, and I find it extremly frustrating.
I'm using Ubuntu at the moment which seems nicer than suse, but then it could be that I just like gnome over KDE?? Anyway its my new Linux flavour of the month.

Today I learned something valuabe - ./configure, make, make install, make clean. This is how you unstall stuff.
you have to compile it!!!

Linux for the people - yeah right!!!

12.9.05

Simple MD5 hash

I made a simple MD5 hasher today, I needed to check some hashes so I thought this might be handy.

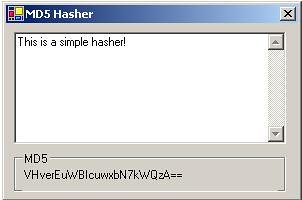
The code is extremely simple, so here it is:

using System;
using System.Drawing;
using System.Collections;
using System.ComponentModel;
using System.Windows.Forms;
using System.Data;
using System.Security.Cryptography;
using System.Text;

namespace hasher
{
///
/// Summary description for Form1.
///

public class hash : System.Windows.Forms.Form
{
private System.Windows.Forms.TextBox txt_data;
private System.Windows.Forms.Label lbl_hash;
private System.Windows.Forms.GroupBox grp_hash;

private MD5 md5;
private UTF8Encoding ue;

///
/// Required designer variable.
///

private System.ComponentModel.Container components = null;

public hash()
{
//
// Required for Windows Form Designer support
//
InitializeComponent();

md5 = new MD5CryptoServiceProvider();
ue = new System.Text.UTF8Encoding();
}

///
/// Clean up any resources being used.
///

protected override void Dispose( bool disposing )
{
if( disposing )
{
if (components != null)
{
components.Dispose();
}
}
base.Dispose( disposing );
}

#region Windows Form Designer generated code
///
/// Required method for Designer support - do not modify
/// the contents of this method with the code editor.
///

private void InitializeComponent()
{
this.txt_data = new System.Windows.Forms.TextBox();
this.lbl_hash = new System.Windows.Forms.Label();
this.grp_hash = new System.Windows.Forms.GroupBox();
this.grp_hash.SuspendLayout();
this.SuspendLayout();
//
// txt_data
//
this.txt_data.Location = new System.Drawing.Point(8, 8);
this.txt_data.Multiline = true;
this.txt_data.Name = "txt_data";
this.txt_data.ScrollBars = System.Windows.Forms.ScrollBars.Vertical;
this.txt_data.Size = new System.Drawing.Size(272, 112);
this.txt_data.TabIndex = 0;
this.txt_data.Text = "";
this.txt_data.TextChanged += new System.EventHandler(this.txt_data_TextChanged);
//
// lbl_hash
//
this.lbl_hash.Location = new System.Drawing.Point(8, 16);
this.lbl_hash.Name = "lbl_hash";
this.lbl_hash.Size = new System.Drawing.Size(256, 23);
this.lbl_hash.TabIndex = 1;
//
// grp_hash
//
this.grp_hash.Controls.Add(this.lbl_hash);
this.grp_hash.Location = new System.Drawing.Point(8, 128);
this.grp_hash.Name = "grp_hash";
this.grp_hash.Size = new System.Drawing.Size(272, 40);
this.grp_hash.TabIndex = 2;
this.grp_hash.TabStop = false;
this.grp_hash.Text = "MD5";
//
// hash
//
this.AutoScaleBaseSize = new System.Drawing.Size(5, 13);
this.ClientSize = new System.Drawing.Size(292, 173);
this.Controls.Add(this.grp_hash);
this.Controls.Add(this.txt_data);
this.MaximizeBox = false;
this.MinimizeBox = false;
this.Name = "hash";
this.Text = "MD5 Hasher";
this.grp_hash.ResumeLayout(false);
this.ResumeLayout(false);

}
#endregion

///
/// The main entry point for the application.
///

[STAThread]
static void Main()
{
Application.Run(new hash());
}

private void txt_data_TextChanged(object sender, System.EventArgs e)
{
byte[] b = ue.GetBytes(txt_data.Text);
lbl_hash.Text = Convert.ToBase64String(md5.ComputeHash(b));
}
}
}

11.9.05

Removing the door panel from a Toyota Corolla '96

I had to remove the door panel from my Corolla yesterday in order to remove the lock. I had to remove the lock because some idiot tryed to break in and they stuffed it up! It took me ages to figure out how to get it off, with this guide it should be possible to do it in about 10 minutes.
The following photos I took with my mobile phone, the super cool Mororola E398. unfortunately the camera doesnt have a very good focus so some of the images are a little blurry.

Step 1:
Remove the screw on the door opener.
This is the most obviuos screw and so I decided to remove it first.


Step 2:
Remove the door winder.
This is a little tricker than I first thought. At first I tryed to pull it off, but that didnt seem to work. I had a brief look online and found a few sites saying that there is a clip that has to be removed and that a "special tool" is reqired to remove it. These "special tools" apparently are avaliable from car parts places. Lucky for me I already had a "special tool" - a flat head screwdriver!
Here is how the clip holds the winder on

Using a flat head screwdriver you can just push the clip off

Here is the clip removed


Step 3:
Remove the arm rest.
This took me awhile to find, but under the arm rest there are two screws. It can be fairy easily removed just by getting either your fingernail under it, or a screwdriver.

Once removed it reveals the screws underneath


Step 4:
This is the easy part. The whole panel is now held on only by push in clips, they can be easily pulled for them to pop out. They are located all around the outside of the panel and look like this

Once they are removed carefully guide the door handle opener through the hole to remove the panel.


Step 5:
To get to the inside of the door the plastic seal has to be removed, this isnt too hard but its sticky. Just peel it away from the plastic


Step 6:
This next part is where it can get really frustrating. There are two screws that hold the door handle on. The first one is visible and not too bad to remove.


The second one was a little harder. The folowing picture was taken through a small hole in the door panel, but you can see the lock and the screw above it. I used a socket with a rachet to remove it


Step 7:
The lock can now be removed by pushing the door handle from the bottom to swing it out. There is a spring that holds the door handle in at the top, I didnt try to remove the whole thing as I'm guessing the trying to put that spring back would be a world of pain. Just grab the lock and twist it anit-clockwise, it should just pop out.


Step 8:
There is a rod connected to the lock which goes to the central locking servo, this can be removed by uncliping the plastic bit on the side and the pulling the rod out of the hole. If at all possible try not to disconned the rod at the bottom, where is connects to the servo - This would be VERY bad as it took me an hour to get the little bugger back on.


Step 9:
All done! I was able to take this bit to a locksmith - with the key, where they were able to fix it. I took it to Marion Locksmiths and they did a great job - thanks!


Step 10:
Putting it all back.
This should be as simple as going backwards, however if you accidently disconnected the servo rod like I did then like Mr T says - "I pitty the fool!".
The rod is fixed to the servo with a little plastic clip similar to how it connects with the lock. The trick is to put the bent bit at the end into the hole and then swivel the plastic clip onto the rold to hold it there. This is how it looks once connected

And this is a closeup of the rod cliped to the servo bit


I should also mention putting the door winder back is a little fiddly, but using the "special tool" its not too bad. Just put the clip half on, then put the winder on and using the screwdriver push the clip on. it required a little force, but not too much.


Well I hope this is useful!